
How AAPLUSDT Trading Works on Bitunix
Learn how to trade Apple stock on Bitunix with USDT, understand how AAPLUSDT works, and explore volatility, leverage, and risk management for beginners.
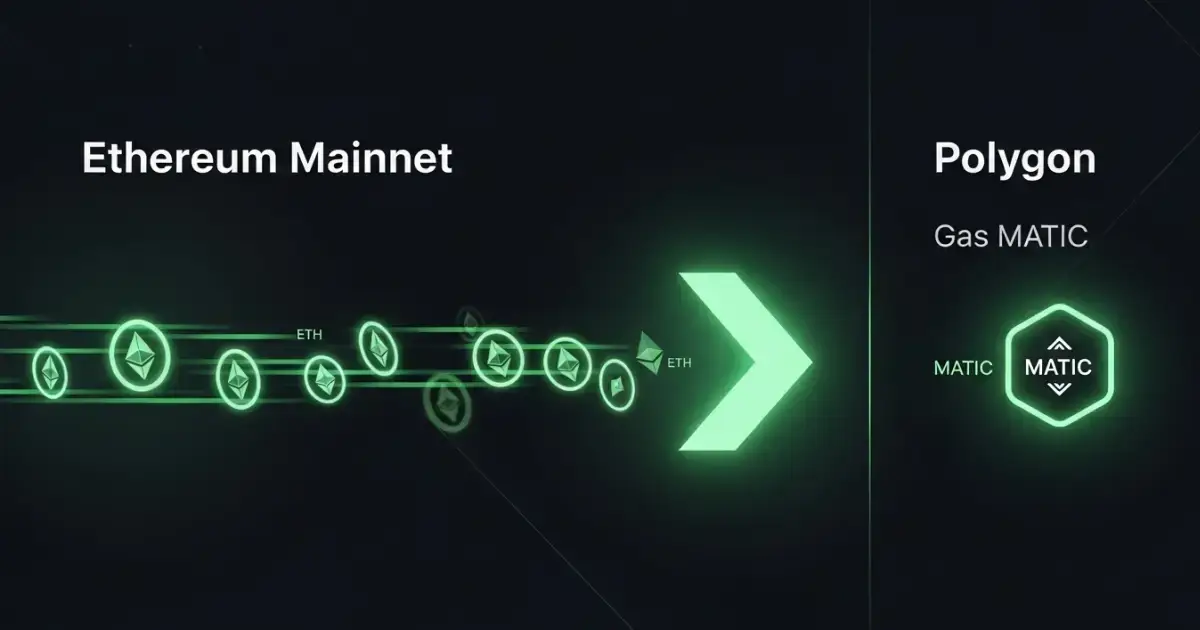
Whether you want lower fees, faster confirmations, or access to Polygon-native apps and yields, moving funds from Ethereum to Polygon is a smart first step. In this guide you will learn how to bridge ETH using the official Polygon PoS Bridge and trusted third-party bridges. You will also see how to get your first MATIC for gas, how to avoid common mistakes, and how to transfer back to Ethereum when you are done.
[ez-toc]

A cross-chain bridge lets you move value between two blockchains. When you bridge tokens to Polygon from Ethereum, the bridge records a deposit on Ethereum and releases the equivalent asset on Polygon. Depending on the design, it will either mint a native representation on Polygon or send you the real native token from a liquidity pool on the destination chain.
The total value locked in the Polygon ecosystem demonstrates its growth and utility.
Bridges are powerful, but they are not all the same. You will see the differences in the section on bridge types below.


This step by step guide will walk you through the bridging process using the official bridge specifically, the native Polygon Bridge via the Polygon Portal. The process involves simple steps and is a straightforward process to transfer assets to Polygon. You will be able to bridge assets such as ETH and ERC-20 tokens from Ethereum to Polygon with ease.
This is the most direct method for an Ethereum to Polygon transfer. The Polygon Proof-of-Stake Bridge is accessible at Polygon’s official web app, the Polygon Portal, and supports deposits of ETH and most ERC-20 tokens.
To start bridging, begin by connecting your Web3 wallet (such as MetaMask) to the Polygon Portal. Connecting your wallet is the first step to start bridging assets to Polygon. Once connected, use the dropdown menu in the interface to select the network and the asset you wish to transfer. Follow the simple steps provided in the portal to bridge assets from Ethereum to Polygon.
Estimated time: a few minutes for deposits after confirmations on Ethereum. Estimated costs: one Ethereum transaction fee for the deposit and a small fee on Polygon when you start using the funds.
In summary, the official bridge via the Polygon Portal is considered the best bridge for most users due to its reliability and ease of use. However, there are different bridges available for bridging assets between multiple polygon chains, including Polygon zkEVM, which offer additional options for transferring assets.
Note: Polygon zkEVM is another option for bridging, offering compatibility with Ethereum, faster transaction finality, and integration within Polygon’s multichain ecosystem. Consider your needs and explore different bridges to find the best solution for your asset transfers.
That completes the step-by-step ETH bridge using the official route.

Withdrawing is different from depositing. The withdrawal process is how you bridge assets from Polygon to Ethereum, moving assets between Ethereum and Polygon networks. Polygon checkpoints batches of transactions to Ethereum at intervals. A PoS withdrawal includes two steps:
Typical withdrawal times range from under one hour to a few hours. You will pay one Polygon transaction to start the exit and one Ethereum transaction to finalize the claim. Plan ahead if you need funds on mainnet by a specific deadline.

You cannot do anything on Polygon without a small amount of MATIC for gas. Here are safe options:
Once you have as little as 0.05 to 0.1 MATIC, you can perform several transactions because Polygon fees are low.

Third-party bridges can move ETH to Polygon quickly by using liquidity pools on both chains. Many of these bridges also support transfers across multiple chains, not just Ethereum and Polygon, making them versatile for users with assets on various networks. They are convenient when you want speed and do not want to wait for checkpoint logic. They do introduce additional trust in the bridge’s validators or relayers. Here are well-known options:
These routes often complete within a few minutes because they rely on liquidity inventory on the destination chain rather than on a checkpoint.
Your total cost has several components:
Tips to reduce costs:

Bridges are popular targets for phishing and social engineering. Protect yourself with these habits:
A CEX transfer is sometimes the cheapest and simplest path:
This method introduces custodial risk during the transfer, so use reputable exchanges and enable strong security controls. It is ideal when you are moving a small balance and want to avoid mainnet gas.
What is the safest way to bridge ETH to Polygon?
The official Polygon PoS Bridge is the canonical path and has strong adoption. It is reliable for deposits and withdrawals. If you value speed over the canonical route, reputable bridges like Hop, Across, or Stargate are widely used and complete transfers quickly by using liquidity pools on the destination chain.
How long does it take to deposit ETH to Polygon?
Deposits usually finalize a few minutes after your Ethereum transaction confirms. Exact timing depends on network congestion. Third-party bridges can deliver even faster since they do not wait for checkpoint logic.
How long does a Polygon withdrawal take?
PoS withdrawals require a checkpoint window before you can claim on Ethereum. Expect under one hour to a few hours in most cases. Always check the interface for current estimates.
Do I need MATIC before I bridge?
You do not need MATIC to send the deposit from Ethereum. You do need a small amount of MATIC to transact on Polygon after the deposit arrives. The easiest method is to withdraw a small amount of MATIC from an exchange to your Polygon address.
Why does my wallet show WETH on Polygon instead of ETH?
On Polygon, ETH may appear as bridged WETH or as an ETH representation, depending on the wallet and bridge. Both versions function for DeFi usage. If a dApp requests WETH, you can wrap or unwrap with a simple contract interaction on Polygon.
Are third-party bridges safe?
They are popular and often audited, but they rely on validator sets or relayers to operate. This adds trust compared to the canonical bridge. Use reputable providers, check audits, and test with a small transaction the first time.
What fees should I expect?
At minimum, you pay one Ethereum gas fee for the deposit and a small Polygon fee to start using funds. Third-party bridges may add a small bridge fee. Withdrawing to mainnet requires a Polygon transaction and an Ethereum claim transaction.
Can I bridge tokens other than ETH?
Yes. The PoS Bridge and leading routers support most ERC-20 tokens. Always confirm you are receiving the correct token on Polygon and avoid look-alike contracts.
Why is my slippage setting relevant if I am just bridging?
Some routes execute a swap as part of the bridge. Keep slippage conservative unless the bridge specifically says it is a pure transfer. Conservative slippage reduces the chance of value loss from volatile moves or MEV.
| Design | How it works | Speed | Trust model | Typical use |
| Polygon PoS Bridge | Lock or burn on Ethereum, release on Polygon after confirmations | Minutes for deposits, longer for withdrawals | Aligned with Polygon’s consensus | Canonical route, large transfers |
| Liquidity network bridges (Hop, Across) | Deposit on source, release from destination pool, later rebalanced | Very fast | Validator or relayer committee | Everyday transfers, time sensitive moves |
| Exchange withdrawal | Custodial transfer, user withdraws on Polygon | Fast once exchange confirms | Exchange custody | Small balances, beginners |
Canonical bridge: The official bridge supported by a network’s core team, often used for native assets between a layer 2 and its layer 1. It is usually the most conservative choice, though exits can take longer.
Light-client or proof-based bridge: A design where a contract at the destination verifies cryptographic proofs of events from the source chain. This reduces trust in third parties but can be more expensive and slower.
Relayer: An independent actor that watches for deposits on one chain and submits messages or proofs on another chain. In liquidity networks, relayers may also front liquidity and are paid a fee for doing so.
Challenge period: A time window during which fraudulent messages can be contested before finalization. Common on optimistic rollups and some canonical bridges. It improves security but adds delay.
Merkle proof: A compact cryptographic proof that a particular transaction or state value exists in a block. Proof-based bridges rely on Merkle proofs to verify deposits or messages across chains.
Quorum and multisig: Rules that require a threshold number of signatures from a validator committee to authorize a cross-chain message. Larger quorums and hardware-secured keys reduce single-party risk.
Timelock: A delay between when a privileged action is proposed and when it can execute. Timelocks give users time to withdraw if a risky upgrade or parameter change is announced.
Slashing: A penalty that burns or seizes a validator’s stake if it signs an invalid message. Slashing aligns incentives in committee-based or proof-of-stake designs.
TVL (Total Value Locked): The amount of assets held by a bridge or its pools. Higher TVL can indicate adoption and capacity, but it can also represent a larger target for attackers.
Utilization: How much of a pool’s inventory is currently committed to pending transfers or withdrawn to the destination side. High utilization can lead to slower delivery or worse quotes.
Rebalancing: The process of moving assets between a bridge’s chain pools to restore target inventories after one sided flow. Rebalancing costs affect fees and speed.
Native asset vs. wrapped or synthetic asset: A native asset is the chain’s actual token, while wrapped or synthetic versions represent that asset on another chain. Prefer native delivery when possible, and verify the redemption path for wrapped tokens.
Finality: The point at which a transaction is practically irreversible on a blockchain. Bridges often wait for a set number of confirmations to reduce reorg risk.
Sequencer: The component that orders transactions on some rollups. Sequencer downtime can delay bridging or swaps until service resumes or a fallback path is used.
Exit liquidity: Available funds on the destination chain to pay out users immediately. If exit liquidity is low, your transfer may be queued or priced worse.
Slippage: The difference between your expected amount and the amount you actually receive, caused by price impact, fees, or inventory moves. Set reasonable slippage tolerance, especially during volatile periods.
You now know exactly how to bridge ETH to Polygon, how to choose the best route for your needs, and how to avoid the common pitfalls. With low fees, a mature app ecosystem, and flexible exits back to Ethereum, Polygon is an excellent network for everyday DeFi use.
Bitunix is a global cryptocurrency derivatives exchange trusted by over 3 million users across more than 100 countries. At Bitunix, we are committed to providing a transparent, compliant, and secure trading environment for every user. Our platform features a fast registration process and a user-friendly verification system supported by mandatory KYC to ensure safety and compliance. With global standards of protection through Proof of Reserves (POR) and the Bitunix Care Fund, we prioritize user trust and fund security. The K-Line Ultra chart system delivers a seamless trading experience for both beginners and advanced traders, while leverage of up to 125x and deep liquidity make Bitunix one of the most dynamic platforms in the market.
Bitunix Global Accounts
X | Telegram Announcements | Telegram Global | CoinMarketCap | Instagram | Facebook | LinkedIn | Reddit | Medium
Disclaimer: Trading digital assets involves risk and may result in the loss of capital. Always do your own research. Terms, conditions, and regional restrictions may apply.


